- 03 9428 4999

Sierra has a new feature which is called ‘Optimise Storage’.
This basically means that if you are someone who never empties your trash, or is constantly running out of hard drive space, your machine can purge itself of all the old files you haven’t touched in forever. It can also store copies of your files in the Cloud for access on all devices.
This sounds like an awesome idea, but there are some things you need to be aware of before ticking those boxes:
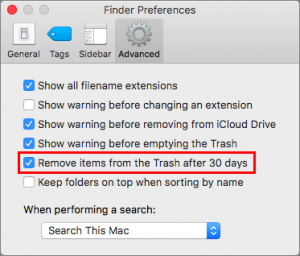
– The ‘Empty trash Automatically’ option does exactly what it says.
It will empty your trash can for you after the file living in it has been there for 30 days. Which is all well and good for those who don’t tend to run applications from their trash. If you are someone who never empties your trash, it is recommended you enable this feature. That way, your hard drive won’t fill to the point of being inaccessible.
This setting appears in Finder > Preferences > Advanced as the “Remove items from the Trash after 30 days” checkbox.
– The Optimise Storage section has a few preference options.
If you want to optimise the Storage on your computer, you are presented with two setup options; one to automatically remove watched movies and TV shows from your machine, and the other to keep either only recent or no email attachments.

Although it currently hasn’t been verified, we believe the Optimise Storage option only applies to movies and TV shows purchased within the iTunes Store. When enabled, iTunes purges watched shows and movies in order to help you regain some space on your hard drive.
To enable within iTunes, or to turn it off, go to iTunes > Preferences > Advanced, where you’ll find a checkbox called “Automatically delete watched movies and TV shows.”

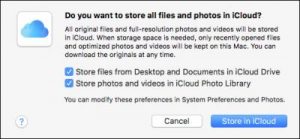
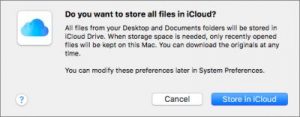
– Storage in the Cloud is slightly confusing
The controls available in this section encapsulate two entirely separate features in Sierra, and the wording and checkboxes change depending on what you’ve already done.
On a Mac that doesn’t have iCloud Photo Library enabled, when you click Store In iCloud, you get a dialog that gives you two checkboxes, one that lets you turn on syncing for your Desktop and Documents folders and another that enables you to turn on iCloud Photo Library. If either of those features is already on, the dialog changes (so it focuses on Desktop and Documents folder syncing).
When enabled in System Preferences > iCloud > iCloud Drive > Options, this feature moves your Desktop and Documents folders from your home folder to iCloud Drive. This means your folders will disappear from your home folder. However, you can still access them from the sidebar in Finder windows. From the Finder’s Go menu, or from within iCloud Drive.
Desktop and Documents folder syncing allows you to enable it on other Macs using the same iCloud account. The contents of those folders on other Macs are merged via iCloud, so you end up with a single unified folder for Desktop and another for Documents. You can even access the full contents of those folders via the iCloud Drive app. Accessible on any iOS device signed in to the same iCloud account.
Two warnings surrounding Desktop and Documents folder syncing:
First, if you have gigabytes of data in one or both of these folders, you may have to start paying, or pay more, for storage space on iCloud Drive. The first 5 GB is free, and after that Apple offers several tiers from 50 GB to 2 TB. The storage space is shared with iCloud Photo Library. So if you’re already paying for storage to sync photos, you may have enough.
The second warning is that turning off Desktop and Documents folder syncing is stressful. When you do this, in System Preferences > iCloud > iCloud Drive > Options, Sierra tells you that all your files will be available only in iCloud, which seems wrong: if you’re turning off syncing, you’re doing so because you want them locally. However, that dialog is followed immediately by another that tells you that you can recover your files from iCloud Drive.
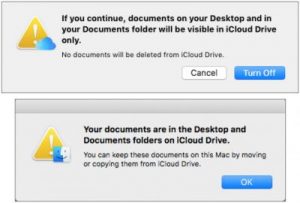
In fact, what happens when you turn off that feature is that Sierra recreates empty Desktop and Documents folders in your home folder. You can’t replace those, so you can’t drag the old Desktop and Documents folders from iCloud Drive to your home folder; instead, you must open each folder in iCloud Drive and move its contents to the local Desktop and Documents folders in your home folder.
If you have local copies of your documents and files backed up prior to optimising your storage, it’s all well and good.
However, if you do not, there is a possibility that you could end up with no local copies at all.
– Cloud storage uses the internet
If you are someone who doesn’t have the best internet connection or are conscious of how much internet you use, storage in the cloud probably isn’t for you.
Depending on the files you are storing in the cloud there is the possibility that the Cloud will smash your internet usage as it tries to pull your 32GB up to the cloud and back again so you can continue to access your files and keep working.
If you are going to use Optimised Storage on your machine, make sure you have a backup of all of your local files before you start. You will also need to make sure you have enough bandwidth to handle the cloud storage.
For more information on Optimised Storage, click here.
MacOS Sierra has been released to the world as of the 20th of September, and tech heads everywhere are excited to try out it’s new features (more information on features can be found here).
Sierra is the twelfth major release of operating system for the Mac, and currently exists as a 4.77GB download in the App Store.
Whilst the new OS does feature some awesome stuff, such as Siri, tabs in Apps and an improved Notification Centre, and more, Mac users do need to keep in mind that Sierra is a brand new operating system. This does generally mean that some bugs will need to be ironed out in the next few weeks and that users may face compatibility issues with other applications they own and the operating system they run.
Before you even consider upgrading your machine in order to utilise Siri for desktop, you will need to backup your computer.
Yes, backing up your computer is imperative.
Why? Because not only does this provide you with a recent backup of all of your programs and files, It also provides you with a solid foundation should anything go wrong with your upgrade to Sierra.
Having a backup before upgrading means that you have a successful backup of a known working operating system. This means that if something goes wrong, your software is incompatible, or you just don’t like Sierra, you have the opportunity to downgrade to something more stable and familiar.
If you don’t have a recent backup, or are worried that creating a backup will be difficult, don’t panic.
Most new hard drives will be detected by your Mac and it will ask you if you’d like to use the drive as your new backup destination.
If the drive has already been plugged into this machine, it is as simple as turning on Time Machine and setting up your Time Machine preferences.
If you are unsure how to do so, click here for a step by step guide to setting up Time Machine.
We at Mac Aid cannot stress enough just how important a recent backup is.
We have seen many clients go through some form of heartbreak due to not backing up their data, and resulting in lost pictures of babies and family, as well as that critical work document needed the following week.
If you find that it just a bit too difficult and would like some help, please don’t hesitate to contact us.
Past Backup Articles:
For past backup articles you can find them below:
Hard Drive Healthcheck (December 2015)
Backup for the Silly Season (October 2015)
Backup, Backup, Backup (May 2015)
You may see a new face around the Mac Aid office these days.
Noel has joined the Mac Aid team as our new salesman.
He will be doing meet and greets with clients in order to help work out what systems need to be in place to help them achieve their goals.
Noel is an avid Mac enthusiast with over 30 years experience in the Apple Ecosystem.
A former Account Manager with Apple, Noel has a rather large collection of older Power PC Macs (some of which were rescued from the tip).
In his spare time he enjoys cycling, walking, meditation and surfing.


Dropbox is beginning to notify its users to update their passwords (if they haven’t updated them since 2012) to something a little bit more secure.
The company claims that this is just a preventative measure and stresses that there are no accounts that have been improperly accessed.
This movement is due to the discovery of a cache of user credentials that date back to 2012 that contain email addresses, plus hashed and salted passwords.
The company doesn’t believe that any accounts have been breached, but is choosing to make older accounts update passwords in order to cover its bases. So if you are one of those with an older account, you shall need to update to a more robust password the next time you sign in.
Whilst changing to a more secure password, Dropbox also encourages you to enable two-step verification in order to add an extra layer of security to your account.
When trying to think up a password or two, it is important to remember the following:
– It’s at least 8 characters long,
– It has a few num8er5 in it,
– It has a special ch@racter or two
– It may not lead with a Capital but has one or two dotted tHrouGhoUt.
Most of all, make it memorable to you. There is nothing worse than having to reset your password all the time because you can never remember it.
If you would like a few other tips about how best to set a new password, and the best practices regarding password security, you can read our previous article here.
After searching for a few weeks, Mac Aid has been able to find a new tech to join the team.
Matt joins us from an internal IT support role, and is excited to earn the engineer badge, and join the fleet of Mac Aid techs out on the road.
Currently undergoing his ‘probationary’ period, you may see Matt accompanying other techs when out onsite. This enables him to meet our clients and provide them with another friendly face, as well as learning whilst on the job.
In his free time, Matt enjoys movies, long walks on the beach, gaming and pizza/KFC.