- 03 9428 4999


Are you running low on storage space on your Mac? The following tips can help you identify what is filling up your hard drive and how to save space, without deleting your important files and media.
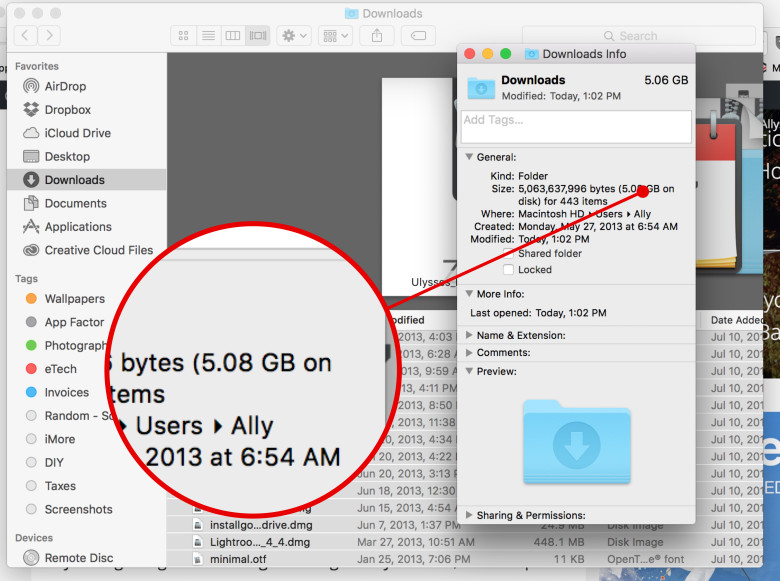
Photo: Ally Kazmucha/The App Factor
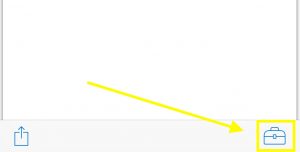
Often you might find that your Downloads folder is filled with files you only needed temporarily – until you save them elsewhere, for example.
Almost everything you download ends up in the general Downloads folder, so this the first place you should look to clear out on your Mac.
Another good place to look when clearing up space on your Mac is your applications folder. You might have downloaded an application for a particular project once and no longer use it. If you’re worried you might need it one day again, don’t worry! Don’t forget that If you have purchased your apps from the Mac App Store you can always download them again at no extra charge.
By now you’ve probably upgraded to an operating system with the new Photos app, replacing your old iPhoto library. One thing to be careful of are duplicate iPhoto libraries that might have been created in the cross over process.
To see if this is the case for you, open a new Finder window, then click on Pictures in the left side menu. If you see an iPhotos Library as well as a Photos Library, chances are you have the same photos duplicated.
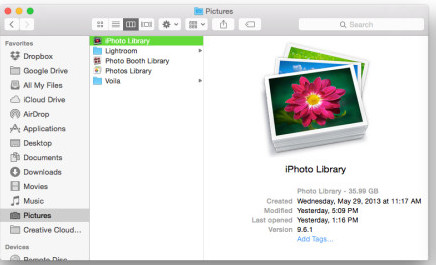
Photo: Ally Kazmucha/The App Factor
Before you proceed make sure to Back up your old iPhoto library (just in case you find there really were extra photos in there that hadn’t be transferred across to your Photos library). You could back this up onto an external hard drive.
Once your old iPhoto library is backed up, you can begin to delete it by dragging it across to the Trash. (Make sure to empty your Trash too, to free up some space!)
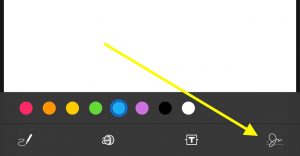
The iTunes store allows you to keep your media in your library without storing them physically on your Mac’s hard drive. That way you can keep your hard drive free for important files and your favourite media and just stream the rest when you’re connected to internet.
To see where your media is being stored, have a look in your iTunes Library to see if the cloud icon is next to it. If it is you can right click on it and choose “Remove Download.”
Caution: “Delete” is not the same as “Remove Download.” Removing the download simply removes the copy on your hard drive, whereas deleting the file, removes the file from your entire Library.
Since the age of digital cameras, most of us have hoards of photos and videos from years ago! You probably find that you rarely view these but they are vitally important to you. If you have files that you don’t require to be immediately accessible, there is always the option of transferring them across to an external hard drive or an online storage service, such as Dropbox. That way when you do need them you can simply plug in your external drive or log into your online storage.
Note: If you are going to transfer your files onto an external drive, we always recommend having a separate back up as well, in case of hard drive failure.
If you decide to use an online storage service, like Dropbox or Google Drive, also make sure that you manage and limit what these services store locally on your Mac. There’s not much point moving all your photos across to Dropbox, only to have Dropbox download them back onto your local drive!
Once you’ve completed these steps make sure you empty your trash to allow the changes to take effect and free your hard drive space. Simply right-click on the Trash icon and select Empty.
The public release of iOS 9.3 has not yet been announced but with beta versions now available, users can already know what to expect in the next update. iOS 9.3 isn’t going to be a huge update for iPhones and iPads, but there is one feature that everyone is talking about: Night Shift.
You’ve probably heard it before – staring at computer or phone screens can tire your eyes and body. And in particular, the blue-tinted light can trick the body into thinking it’s still daytime. Needless to say, using your phone with blue-light before bedtime can easily mess with your sleep and lead to daytime exhaustion.
That’s where Night Shift comes in. Turning this feature on adjusts the screen to warmer hues. It reduces blue light and displays a screen that is less harsh on the eyes.

We hope that your Christmas break was full of merriment, good food, great people, and most of all safe.
After having eaten all the turkey, unwrapped all the presents and celebrated the New Year, Mac Aid employees are now back in the office and ready to see to a great 2016.
Office hours are now back to normal: Monday – Friday 9:00am – 5:30 pm, we hope to see you soon!