One of the most frustrating things in life is losing all of your information at the most inconvenient time. To avoid this hair pulling and teeth grinding experience, backing up your Mac is essential.
We can provide you with a whole big essay as to why you should be backing up your Mac and giving you details of various backup software. But for this article, we will simply focus on the readily available, Time Machine.
Backup with Time Machine
This is by far the simplest and cheapest way to backup your data. Time Machine is a built-in feature that can be easily found in your System Preferences.
What’s great about Time Machine, is that it can be used to restore your computer as well as being a helping hand when you need to transfer your data to a new Mac.
Time Machine will make hourly backups for the past 24 hours, daily backups for the past month and weekly backups for each month. It will also create simple to navigate snapshots. It makes looking for the version you want easier.
What’s great about the Time Machine backup is that it will only backup the changes that have been made to files since the last round of backup.
Once configured, this can run automatically for you onto an external drive. Depending upon the external drive that you have, you may need to format it to be Mac compatible prior to setting up the backup.
Alternatively, you can purchase a ‘For Mac’ Drive to avoid the need to format. One of our favourites is the LaCie Rugged Drive. This comes in either a 1,2 and 4TB storage options. Picking an external drive, all depends on how much data will need to be stored. If you get stuck in choosing, give us a call and we can help answer this question for you.
How to set up Time Machine
Time Machine is available for Mac OS X Leopard and above.
Connect the external drive to your Mac
An alert should pop up asking if you would like to use it with Time Machine. Click ‘Use as Backup Disk’. If you do not see this alert, then go to System Preferences -> Time Machine. Click ‘Use Disk’
You can also choose if you would like to encrypt your backups. In order to access these backups, you will need a password.
Can I backup multiple Macs with the one drive?
The simple answer is yes. You will need to make sure that you are using an external drive that is big enough to accommodate all the backed up data.
The simplest way of achieving the backup is to unplug the drive from the current Mac. Just make sure that it has finished backing up first before you unplug it. Then simply plug it into the next Mac and the set up will start all over again. When it begins to backup, Time Machine will create a new file for all of this data to go into.
If on the other hand, you don’t want to be plugging and unplugging over and over again. Then why not look at backing up over a network? For more information on this form of setup, please contact us for a discussion.
If you would like to know about other options to backup your Mac, then our next choice, Archiware is available. To have a read, click here.
Do you regularly update your operating system?
There is constantly new technology superseding what is currently out there.
Along with this, it means that support for older versions become non-existent by their manufacturers.This then leads to having a lack of performance updates and security updates.
But it isn’t all bad news. By upgrading to their latest operating systems, not only does it give you better security, but also enhanced features.
Let’s take a look at what has been happening in this space.
Windows Operating Systems
Windows XP. This operating system has been available for 12 years. Support for this version ended 8th April 2014. Windows Vista. Support for this has completely ended on 11th April 2017. Windows 8. This is where it gets tricky, so pay close attention to this one. The ‘Mainstream Support’, which contained security and feature updates ends on 9th January 2018, whilst the ‘Extended Support’, which contain security patches will end on 10th January 2023.
Mac Operating Systems
Although Apple doesn’t announce when support ends for their operating systems, we can instead provide you with information on when the last security update was released. OS X 10.8 Mountain Lion. Last security updated was released on 13th August 2015. OS X 10.9 Mavericks. Last security update was released on 18th July 2016. OS X 10.10 Yosemite. As of 17th October 2017, the last security update was released on 19th July 2017.
What if I still have one of these?
If you do have one of these operating systems, it doesn’t mean the computer will stop working. It simply means that with the lack of security updates, it can’t fix any vulnerabilities that may come through. Essentially, it is considered to not be secure in keeping users and their data safe.
What can I do about it?
If you are unsure of what to do, you can always contact us to find out what the best solution is for you. This will mean reviewing the age of your computer in order to find out which operating system we can upgrade it to. Plus, we can back up your data (if you haven’t already done so), check your current software status and make the necessary changes.
For Mac users, provided you are on OS X 10.8 Mountain Lion (or later), you can easily upgrade to High Sierra. For more information on upgrading to High Sierra, see this Apple ‘How to’ page.
Just like with any technology these days, you will also need to be wary of compatibility issues with any other software you may have,
For more information on Windows operating system lifecycle, see to Microsoft Support.
Mac Aid Techie
We continue with our series of getting to know our Engineers and Technicians that provide you with help and support. This month, we get to know more about Lee.
Lee has been a Mac Aid techie since June 2015 and works on a part-time basis, mainly working in-house to provide support to clients via remote access as well as making sure client backups are running smoothly.
When he is not monitoring backups, he assists Ricky with fixing machines in-house. This involves troubleshooting software errors and opening machines to locate faults.
On one of these routine jobs, an iMac was brought in by a client, with an interesting fault. A small portion of the LCD screen was blocked. This was the result of a particularly adventurous ant that decided to crawl in between the LCD panel and the glass panel. Due to the heat and lack of oxygen, it led to its demise a few centimetres in. However, despite Lee’s best efforts to try and rescue the screen, it proved unsuccessful. Despite the seal between the glass and LCD supposedly meant to be impenetrable, it was not covered by Apple warranty.
Apart from finding this moment interesting, one aspect that Lee enjoys above all else is receiving a brand new Mac (untouched and still in its packaging) and putting together all the software that a client needs to achieve their work. Because who can resist opening up a packaged Mac and work on something that is shiny and new?
Should you ever need to purchase a new mac and need it set up with certain requirements and have your data transferred, then you know who to ask!
What about outside of work? In Lee’s own words. Just a typical nerd that is a movie buff and into music as well as being an avid gamer. Lee also plays tabletop RPGs, enjoys board and card games and occasionally reads.
What is the difference between POP, IMAP and Exchange?
We have all been using emails for as long as we can remember. But do you know what type of email protocol you are using? Do you know how it all works? It is a good idea to find out what you have, especially if you wish to change how you are accessing them.
These three methods (protocols) enables users to gain access to their email. Each protocol (POP, IMAP and Exchange) downloads messages from the mail server onto a device. Access to these messages is then achieved by applications such as Apple Mail and Microsoft Outlook, just to name a few. But that is where the similarities end.
POP
This stands for Post Office Protocol.
Using POP accounts is great for those that access their email from one computer and backup their hard drive on a regular basis. This is because your messages are immediately downloaded to your device and as a result is then no longer maintained on the mail server. Thus your actions will not be replicated between devices. For example, when you create and organise folders on one device, this action will not appear on other devices.
IMAP
Stands for Internet Message Access Protocol.
The messages live on both the server and device/s. It gives users the ability to quickly access the messages from any device and any actions (reading, filing, replying, deleting) will be replicated between all the configured devices.
This means that users with IMAP will see that their email account will synchronise the content between the device/s and the email server.
This type of protocol is great for those who access their email from different devices, such as an iPhone, iPad and iMac.
Exchange
This protocol is similar to IMAP, but with a few extras. It requires a server supporting Exchange functionality (Exchange, Office365, Kerio). With Exchange, it provides users with a few key extra functionality features, such as synchronisation of calendars and contacts. It also includes better support for mobile phones.
Is it easy to switch from POP to IMAP?
There are a few steps that you will need to take if you are using POP before you can switch to IMAP email protocol.
Backup your email to an external hard drive, this will minimise the risk of misplacing messages.
Once you have created an IMAP account within your mail client, you may need to drag the messages across in order to save them in IMAP.
If you ever find yourself stuck or unsure, it may be best to bring the device into our office in Burnley and we can complete the task for you and even aim to transfer your messages for you.
Migrating To Exchange
Contact us to discuss this, and potentially arrange assistance, as this can be tricky and the method can change depending on the circumstances.
Autoplay videos are, for the most part, an annoying part of browsing online, as they are usually ads or the same video that you just saw. Or simply a video that you have no intention of watching whatsoever.
But now, you can easily disable autoplay for any particular web page that you venture to. There are two ways to go about doing this, let’s go through them both.
autoplay for any particular web page that you venture to. There are two ways to go about doing this, let’s go through them both.
The quickest way to disable
This method is designed to work on the web page that you would like to stop the autoplay from occurring.
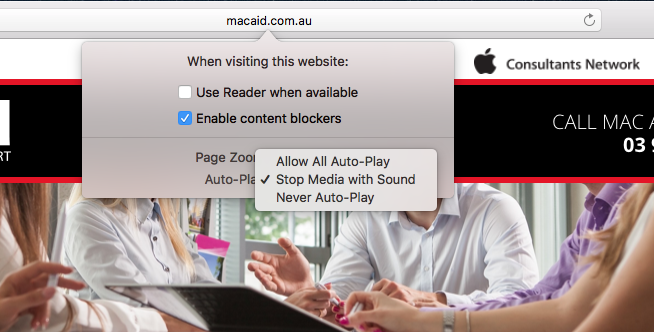
1. Make sure you are on the website that you are wanting to make the change to. Click Safari > Settings for This Website…”
2. This pop-up below will appear. The last option list is Auto-Play. Click on this and you can select one of the three options listed. Once selected, click anywhere outside the pop-up box and you are done.
Stop autoplay a different way
This method is also great if you would like to change the settings for multiple open web pages. This feature will also allow you make a general request to any other visited website as well.
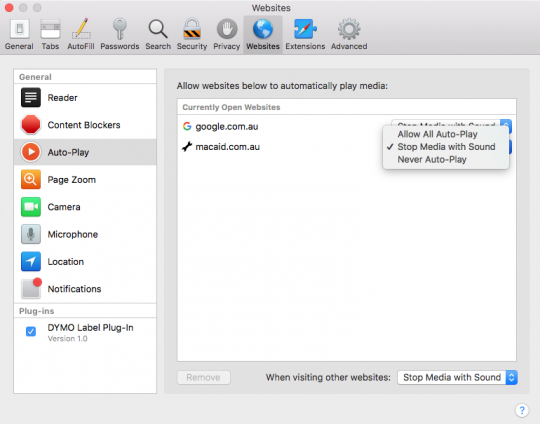
1. Go to Safari at the top left-hand corner and click on Preferences. You will see something similar to this. On the left-hand side of the screen, click on Auto-Play. The same three options will appear for you to make your selection.
2. On the left-hand side of the screen, click on Auto-Play. The same three options will appear for you to make your selection.
3. Once you have made your selections, then simply close the window.
If you have made your selection to ‘Never Auto-Play’, videos can then be played manually by pressing the play button on the video.


 Windows Operating Systems
 When he is not monitoring backups, he assists Ricky with fixing machines in-house. This involves troubleshooting software errors and opening machines to locate faults.