Macquarie Group and ING Direct have announced that they are joining the Apple Pay party.
With the list of banks slowly growing (found here), this creates greater accessibility for users to actually be able to pay with their Devices rather than their physical cards.
ING Direct and Macquarie are well-known brand names and have national reach, giving them the edge over rivals like Bendigo and Adelaide Bank, and Bank of Queensland in attracting customers.
Larger banks control about 80 percent of Australia’s mortgage market, and regulators are likely to welcome greater competition from the smaller banks with mobile banking platforms.
ING Direct and Macquarie, which each have less than 3 percent retail market share, both lack physical branch networks. This gives them a cost advantage over the Big Four, but means they rely on digital channels and word of mouth to attract business.
Macquarie Bank head of personal banking Ben Perham said the introduction of Apple Pay, allowing customers to make payments with iPhones and Apple Watches, would further enhance the bank’s digital offering.
Soon it won’t be long before everyone can pay just by presenting their phone or watch at the register!
If you’re new to Apple Mac, mastering a few crucial Mac keyboard shortcuts will make using your Apple computer easier and much quicker.
Cutting your reliance on your mouse, not only makes you faster when using your machine, you’ll no doubt impress a few family members or friends.
Here are the top Mac keyboard shortcut tricks you need to memorise:
First up, take a look at the Mac keyboard in front of you to familiarize yourself with a few Mac-specific keys. The Command key has a special symbol (⌘) to help you recognize it, while the Option key can also say “alt” on it, a term borrowed from a Windows environment. Your keyboard may also have a Function key (fn) next to the Control key (which just bears its own name — “control”).
Quit any Mac program
Command-Q: If you’re coming from a Windows computer, you might have gotten used to “X-ing out” of your applications by clicking on the X button at the top of any application window. In OS X, you close windows with the red X button (in the upper left of your window), but it will not quit the app. To fully exit out of any Mac program in OS X, you’ll need to use the Quit command with this shortcut, or click on the app menu, then choose Quit.
2. Close Mac windows quickly
Command-W, Option-Command-W: The first of these will close whatever active window you are using, while the second one will close all the windows in the currently active app (or Finder). These shortcuts will do the same thing as the Close Window option in the Finder and most other apps. Chrome, for example, delineates between Close Window (Command-W) and Close Tab (Command-Shift-W).
3. Open a new web browser tab on Mac
Command-T: Whether you’re in a web browser like Safari or Chrome or in the Finder itself, this keyboard shortcut will open a new tab for you. Keep hitting this shortcut to open multiple tabs.
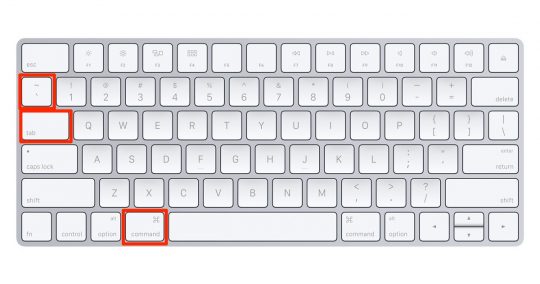
4. Quickly switch between Mac applications
Command-Tab, Command-~ : The first of these shortcuts will activate Mac OS X’s built-in application switcher, which will let you switch between active apps running on your Mac. Keep holding down the Command key and press Tab repeatedly to go to the next app from left to right. Use Command-~ (tilde, usually above the Tab key) to switch to running apps from right to left whilst in the application switcher. Holding down the Command key and hitting Q will quit whatever program you are currently highlighting.
5. Cut, copy and paste on Mac
Command-X, Command-C, Command-V: These are three of the things most often used. Learn these three essential shortcuts (Command-X for cut, Command-C for copy and Command-V for paste — go figure), and you’ll save a ton of time every day.
6. Take Mac screenshots
Command-Shift-3, Command-Shift-4:Command-Shift-3 will take a picture of your entire Mac’s screen, from the upper left to the bottom right. Command-Shift-4 will turn your mouse cursor into a set of crosshairs that you can then click and drag around any portion of your screen to capture only the relevant area.
Note: Tap the spacebar once to take a screenshot of a specific window, or hold the spacebar to move the selected area around without changing its dimensions.
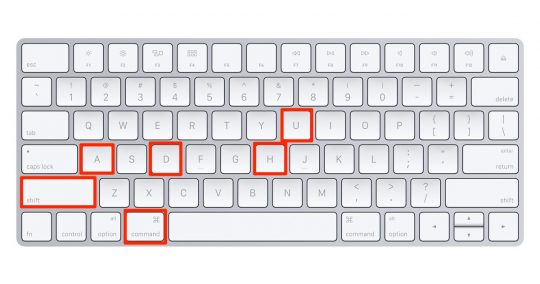
7. Open Mac Finder folders
Command-Shift-A, Command-Shift-U, Command-Shift-D, Command-Shift-H: In the Finder, you’ll need to navigate to any number of common folders: Applications, Utilities, Desktop, and Home. Simply hit the Command key and then the first letter of each of these to go directly to them.
8. Force quit a Mac app
Command-Option-Esc: If an app stops responding, you might need to force it to quit. You can do that with a right-click on the app icon in the Dock, but it’s even easier if you hit this keyboard shortcut. This will bring up the Force Quit dialog, which you can then use to kill that unresponsive app. You might need to Command-Tab your way out of an active frozen app first, or use Command + Shift + Option + Esc to quit the currently active app.
Hope you have enjoyed learning these quick Mac keyboard shortcuts.
Merry Christmas!
Mac Aid will be running limited services for the Christmas period.
The team’s final day in the office is December 22nd.
From the 23rd of December, through to the 8th of January, Mac Aid will have a skeleton crew operating.
The full team will return back to the office January 9th.
If you have any issues or queries, please do not hesitate to call the office during this period. Alternatively, you can email our support address.
A technician will help you as soon as they are available.
The entire team at Mac Aid wishes you a safe break, and looks forward to seeing you in 2017!
With the Apple releases of new MacBook Pros and AirPods, and it being around Christmas time, it’s no wonder stock is flying off shelves nationwide.
The demand has been so high in fact, that even Apple themselves are struggling a little to keep up a steady supply.
If you happened to have ordered some goodies through Mac Aid in the past, the general waiting period is approx. 2-3 weeks for CTO (custom ordered) equipment.
Due to the massive demand for the new Apple tech, the wait is unfortunately longer.
This doesn’t apply to all stock, but if you are waiting for a new shiny laptop, you may not be receiving it until mid-late January.
If you would like to know more specific wait times on stock, please don’t hesitate to ask.
Apple’s AirPods are a relatively new addition to the Apple market.
They are sleek and wireless, making them a fancy accessory for those who hate being attached to their phones and other devices via cables.
For those lucky enough to have a pair, or those who have only just received them, here’s a quick guide on how to connect, charge and customise settings.
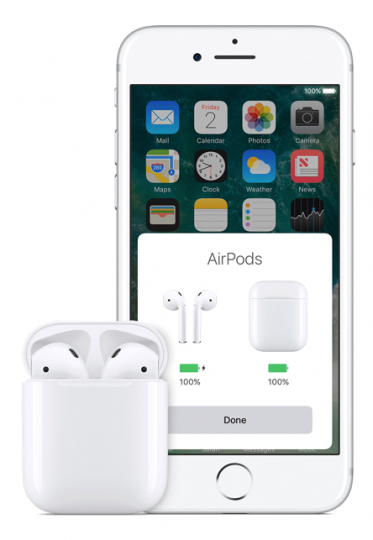
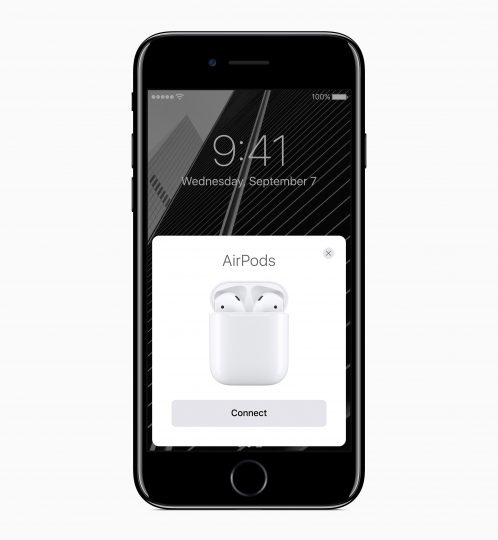
Connect AirPods to iPhone
1 – Press the Home button to unlock your iPhone screen.
2 – Open the AirPods case — with your AirPods inside — and hold it next to your iPhone.
3 – A setup animation appears on your iPhone.
4 – Tap Connect, then tap Done.
Note:If you ever need to pair them with a different device, put the pods back in the case, open the lid, and then hold the setup button on the back of the case until you see the status light flash white.
Listening with AirPods
These should play audio from your Apple Watch or iPhone automatically. However, if you need to change your audio output manually, do this:
On your iOS device:
1 – Open Control Center by swiping up from the bottom edge of the screen.
2 – Swipe from right to left to control audio.
3 – Tap the button that looks like a triangle with three circles, then choose the device you want from the list.
Charging your AirPods
To recharge, all you have to do is put them back in the charging case. The case comes with a built-in battery, giving you up to 24 hours of total listening time. To charge the case, simply connect it to the Lightning cable that came with it and plug that into a USB port. Note: Charging for approx. 15 minutes in the case gets you about three hours of music time.
Personalising AirPods features
From this screen, you can choose to turn off Automatic Ear Detection. There’s also an option to change the mic pickup from the left to right side or have it adjust automatically.
Along with Siri support, the new AirPods have a bunch of little features that can be turned off in the AirPods app on your iPhone. You can change the double-tap setting so it either activates Siri or pauses/plays music.
To customise your AirPods settings follow these steps:
1 – Open the AirPods case.
2 – Go to Settings >> Bluetooth on your iOS device.
3 – Tap the “i” button next to the AirPods in the list of devices.